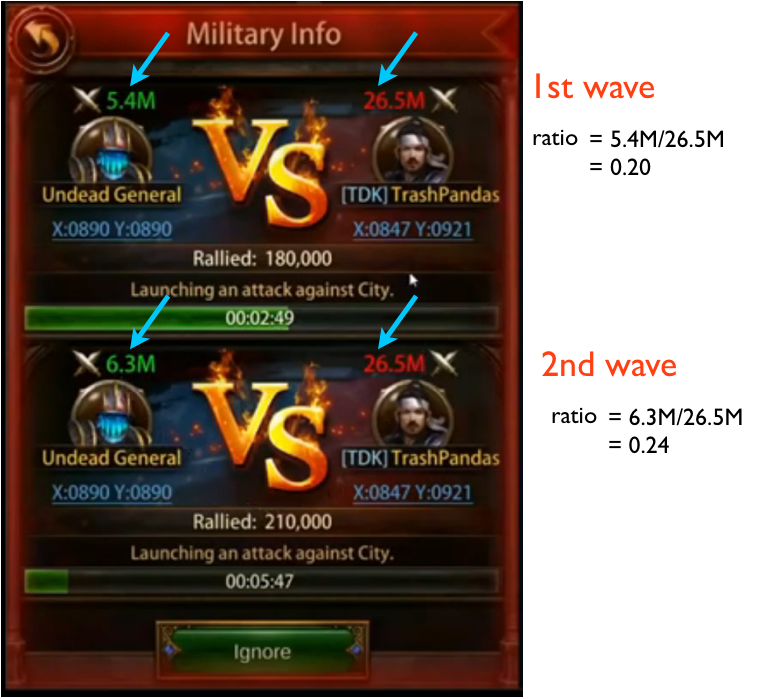
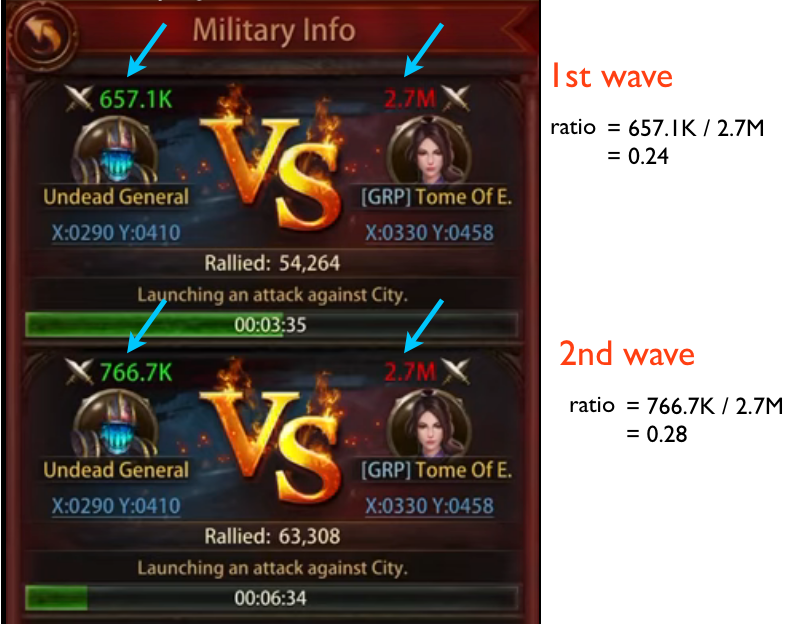
Initial undead event power ratio
Take the ratio of the first undead wave power to your own power. In the following two examples, ThrashPandas’ ratio is 0.20, or 20%, and ‘Tome of E.’ ratio is 0.24, or 24%.
All things taken equal, TrashPandas is going to do better than Tome. As the ratio increases, so does the likelyhood that the player will not survive without some boost. For example, consider the initial ratios of the following 3 players:
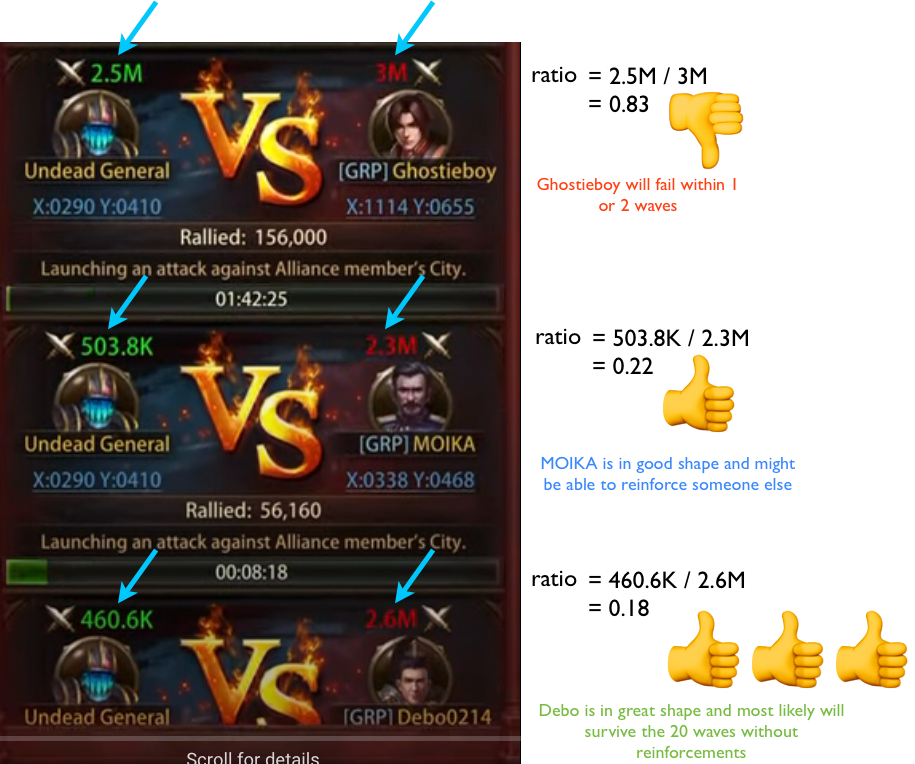
- Ghostieboy’s ratio is 0.85. His terrible initial shape is quite bad.
- MOIKA’s ratio is 0.22, similar to ThrashPandas and ‘Tome of E’. He is good initial shape.
- Debo0214’s ratio is 0.18. He is excellent initial shape.
In general, if the initial ratio is below 15%, the player will have an easy time deadling with the waves, maybe even without a boost or reinforcement. If the initial ratio is above 35%, the player will not survive the 20 waves without some boost or reinforcement. Players with an initial ratio between 15% to 35% will fare in between.
The following are the ratios of Merlin and the commanders against the power of the 1st wave of undeads, sorted in ascending order:
Player
Maddie
Galiosen
Akai tora
Aretila
Ilya
Cheledon
Shalaak
Lion Tamer
SPra
Maleo
Necroboi
Merlin
Player pwr
2600
1600
676.9
1600
647
1800
2400
4100
8700
3200
859.3
4600
undead pwr
140.2
89.6
59
246.3
140.2
394.8
657.1
1500
3200
1500
594.1
3200
pwr ratio
0.054
0.056
0.087
0.154
0.217
0.219
0.274
0.366
0.368
0.469
0.691
0.696
I know that all the green ratios survived the 20 waves. I (akai tora) was not reinforced; Galiosen was reinforced for the last few waves; I do not know whether Maddie and Aretila were reinforced, but both lasted the 20 waves.
For the black ratios, I know Cheledon survived, but I don’t know if she got reinforcements. I don’t know whether Ilya and Shalaak survived. On the other hand, all the red ratios died, most within the first 5 waves.
The undead power
The power ratio is
$$
\mbox{power ratio} = \frac{\mbox{undead power}}{\mbox{player power}}
$$
The undead power depends exclusively on the level of the keep, which is also the level of the city. Nothing else matters; the VIP level doesn’t matter, the monarch level doesn’t matter, and more importantly, the player power does not matter.
The number of troops and the power of the undead follows the following pattern:
wave
1
2
3
4
5
6
7
8
9
10
11
12
13
14
15
16
17
18
19
20
pwr increment %
1
1.16
1.33
1.5
1.66
2
2.33
2.66
3
3.33
3.83
4.33
4.83
5.33
6
6.66
7.33
8
8.66
9.33
Δ increment
0.000
0.167
0.167
0.167
0.167
0.333
0.333
0.333
0.333
0.333
0.500
0.500
0.500
0.500
0.667
0.667
0.667
0.667
0.667
0.667
This is the most common pattern, but there are variations of the pattern at some levels.
The power increment percent (the 2nd column) indicates how much stronger will a given wave be compared to the first wave. For example, wave 20 is 933% more powerfull than the first one. This can help us predict in what wave we will have trouble. For example, consider the initial power of Galiosen, i.e., 1.6M, vs. the initial power of the undead, i.e., 89.6K. Her initial power ratio is 89.6K/1600K = 0.056. We know that she will have troubles when the ratio is about 0.35. Hence, she will have troubles when the wave is 0.35/0.056 = 6.25 times stronger. Thus, we look for 6.25 in the power increment percent column and find that she will probably have troubles between wave 15 (6 times stronger) and wave 16 (6.66 times stronger), and indeed she did, i.e., she had to be reinforced from wave 15 and on.
The Δ increment column (the 3rd column) indicates the pace at which the power of the waves increases. Waves 1 to 5 increment at the same rate, as do waves 6 to 10, and waves 11 to 14, and waves 15 to 20. Since the increment within these sets of waves is constant, a player will have a good chance to survive a set if she can survive the first wave of the set. The challenges come when the waves change pace, at waves 6, 11, and 15. At these points, the new wave feels much more stronger than the ones that we have previously received, because it is, i.e., there has been a rapid increment in the pace of the increase of the power. If the player has troubles surviving the first wave of a set, she probably will not survive the set without a boost.
We can also use the increment in power to predict the number of undead troops and their strenght given the number of troops of the first wave and their strenght. All we need to do is to multiply the value of the first wave by the power increment %. For example, if the number of undeads in the first wave is 12k, then their number would be 6 times larger in the 15th wave, i.e., 12k x 6 = 72k troops. Likewise, if the power of the initial wave of undead was 59k, then their power in the 15th wave will be 6 times large, i.e., 59k x 6 = 354k.
wave
1
2
3
4
5
6
7
8
9
10
11
12
13
14
15
16
17
18
19
20
pwr increment %
1
1.16
1.33
1.5
1.66
2
2.33
2.66
3
3.33
3.83
4.33
4.83
5.33
6
6.66
7.33
8
8.66
9.33
troops
12
14
16
18
20
24
28
32
36
40
46
52
58
64
72
80
88
96
104
112
power (k)
59
68.9
0
0
98.4
118.1
137.8
157.4
177.1
196.8
226.3
255.8
285.4
314.9
354.2
0
433
472.3
511.7
551
The player power
This portion is a work in progress. The power ratio is
$$
\mbox{power ratio} = \frac{\mbox{undead power}}{\mbox{player power}}
$$
The second component is the player power. It is the sum of the following powers:
- Monarch power: from the gear your monarch wears
- construction power: how much you have built
- technology power: how much you have researched
- troops power: level and number of troops
- traps power: level and number of traps
- talent power: from the talent points of your monarch
- subordinate city power:
I have the impression that there should be yet another component to the player power, which comes from the general and its gear.
Of these powers, the troops and traps power comprise around 50%, so they are the most important. That said, this also means, that 50% of the power has nothing to do with troops and traps. Thus, a player that has followed the main quest would derive most of her power from troops and traps, while one that has followed the side quest would derive her power from all the possible sources.
The total power is somewhat summarized as the monarch level, while the troop and trap power is somewhat summarized as the city level. Thus, a player that follows the main-quest line will have a high city level and a low monarch level, while a player that completes many side quests will have a low city level and a high monarch level. The following are the monarch and city levels of these players at the time that the event took place.
Player
Maddie
Galiosen
Akai tora
Aretila
Ilya
Cheledon
Shalaak
Lion Tamer
SPra
Maleo
Necroboi
Merlin
monarch lvl
17
16
15
16
15
18
17
22
21
18
16
21
city lvl
14
13
11
16
14
18
21
22
24
22
19
24
monarch/city
1.21
1.23
1.36
1.00
1.07
1.00
0.81
1.00
0.88
0.82
0.84
0.88
And now compare the results with their power ratios:
Player
Maddie
Galiosen
Akai tora
Aretila
Ilya
Cheledon
Shalaak
Lion Tamer
SPra
Maleo
Necroboi
Merlin
Player/undead
2600/140.2
1600/89.6
676.9/59
1600/246.3
647/140.2
1800/394.8
2400/657.1
4100/1500
8700/3200
3200/1500
859.3/594.1
4600/3200
pwr ratio
0.054
0.056
0.087
0.154
0.217
0.219
0.274
0.366
0.368
0.469
0.691
0.696
monarch/city level
1.21
1.23
1.36
1.00
1.07
1.00
0.81
1.00
0.88
0.82
0.84
0.88
Thus, the ratio of city level to monarch level inversely correlates with the power ratio: the lower the power ratio, the higher the monarch to city ratio, and viceversa. Hence, broadly speaking, the event seems to favor players that follow the side quests, and penalizes players that follow the main quest.
Having followed the main quest does not mean that the player is bound to fail the undead event but, instead, that she needs to take measures that players with that favor side quests would not need to take, like
- get reinforments
- consume a 1-hour defense or offense boost
- produce more armies and traps in a rush, using speed ups
Likewise, there are ways to deteriorate your shape:
- fail to heal armies in time
- spread too thin reinforcing others
Traps
From academy->defense-> trap/abatis/rock/fire arrow attack, the different types of traps have different purposes:
- trap attack -> ground troop
- abatis attack -> mounted troop
- rock attack -> ranged troop
- fire arrow -> siege machines
The undead troops are exactly split in fourths, i.e., 1/4 of the undead troops will be ground, another 1/4 will be archers, another 1/4 will be horses, and another 1/4 will be sieges. Hence, all the different types of traps will have the opportunity to get used.
Some way to make the traps more effective:
- having the monarch wear the durable crown to speed up trap production
- research defense->’trap x’ attack
- research defense->defense capacity
- research defense->’trap x’ power
- research defense->adv. trap power
- Using points on the lv 26 monarch talent ‘Trap triggering’
Troops and healing
A given type of troop has advantages over another type of troop:
- ground has an advantage over range (archers)
- range has an advantage over mounted
- mounted has an advantage over ground
The common wisdom is to send the sieges away during the undead event, either to a nearby resource tile or to the alliance’s keep. Do not send them far away if you intend to reinforce someone far away, teleporting, because we cannot teleport unless all the troops are back in the castle.
After each wave, we will have a number of soldiers in the hospital. There are a many things that we can do to speed up the healing process, like researching Defense (to prevent the soldiers from getting hurt) and Medical Aid (to heal them up). However, during the undead event, probably the most important help comes from other players.
If you are in an alliance and have level 11 or higher, you can build an embassy. Every time that a player requests help for research, construction, or healing, a button appears over the embassy. Pressing this button reduces the time that it takes the other player to complete the task. When we press this button we are not transfering any of our resources to the player in need. Instead, this is help that comes for free, i.e., we are helping the player at absolutely no cost of our own; we are not losing speedups, or resources, or money… nothing. Thus, we should hit that button as often as possible.
When we select embassy->detail, it tells us the ‘times of receiving alliance helps’ and the ‘reduced time on a times by alliance help’. The first one is the number of people that can help us; the second one is the number of seconds that each of them helps us with. We increase the first one researching Alliance->Alliance help time, and the second one researching Alliance->Alliance help amount.
Thus, suppose that after a wave we have 200 soldiers in the hospital and the time to heal them is 30 mins. The span in between waves is 3 mins. We hit the heal button of the hospital, and then press the ‘request help’ that will appear over the hospital. As soon as we hit that button, a request for help will show up on top of the embassy of every member of the alliance that has one. Suppose that we can receive help 20 times, and that each time our time is reduced by 120 seconds. If at least 20 people hit that help button, in a matter of seconds we will receive help that amounts to 20 x 120 = 2400 secs = 40 mins, i.e., we will heal our 200 soldiers instantaneously, and would have had 10 mins of help to spare. This only works if enough people help, though. Remember, helping does not cost anything; we do not lose resources or gold or speed ups or gems or stamina, so we should hit the button as often as we can, until the last person of the alliance is done with the event.